
“Equipment”
A couple of months ago I happened across the image of an Ulster Observation Hive. It was one of those rare moments where I thought, “I could make that.”
At the time I also had a lot of scrap mediums. The finger joints had been miscut, I had received a refund from my supplier, and I wasn’t required to send them back, so I had the sides just sort of sitting around waiting for a project.
I drew the hive in Google Sketchup, which helped tremendously, since I changed designs after miscutting and breaking some end pieces. So here are some shots.
The design in Sketchup:

And here’s how it works.
Here is a normal looking medium nuc. The only visible difference between this and any other nuc is the ball feet on the bottom board. An invisible difference is also that the bottom board is screwed to the box.

If we take off the outer and inner covers, we see some vents in the bottom. These along with the ball feet provide good airflow. You’ll see why this is important as we progress.

One other difference you’ll notice are the four threaded sleeves in edge of the box. This style of observation hive isn’t much more than a modified lid. But of course the lid must stay on if this hive is used at public events. This is the purpose of the sleeves.

This next shot simply shows the usual set of five frames in this nuc. It’s just here for reference in case anyone doesn’t know how these frames normally look from the top.

Finally we get to the observation part of this hive. Here is a shot of what goes into this. The modified lid with it’s window, a feeder frame, and a stop for the normally-open entrance.

To use the observation lid, the normal covers are removed, and the feeder frame replaces the middle frame in the nuc.

The modified lid is put on top of the nuc instead of the inner and outter covers. The narrow top is removed from this modified lid. This narrow top slides down over the threaded posts. It is held on by some knurled brass thumb nuts visible in the previous images.

The frame which was replaced by the feeder frame and is presumably covered in bees is now slid into this single-frame width spot. There are small pins on each of the rebates to center the frame and keep it somewhat stable.

The narrow lid is replaced and tighted down with the thumb nuts. The entire lid is held in place by four thumb screws which tighten into those threaded sleeves we saw previously. A line of holes in each side of the lid provide some airflow from bottom to top.

And here’s the fully assembled observation hive. You’ll have to imagine the bees being inside the window. The thing I really like about this style of observation hive is that it’s really just a nuc. With minimal planning, it can go to a show, look nice and be seen, and then come back and be put right into the yard again. 
Some coming additions will be a strip of queen excluder under the visible frame. This allows the queen to be put in the top portion and for it to be inescapable. Everyone at public events always wants to see her. Some side covers will also be nice so the bees can have darkness to and from wherever they’re going. Side covers would also allow for the lid to be put in place the day before an event since they would provide darkness for the rest of that day. The entrance reducer would be put in place that night when all the bees are home. The hive is then completely ready the next day’s event.
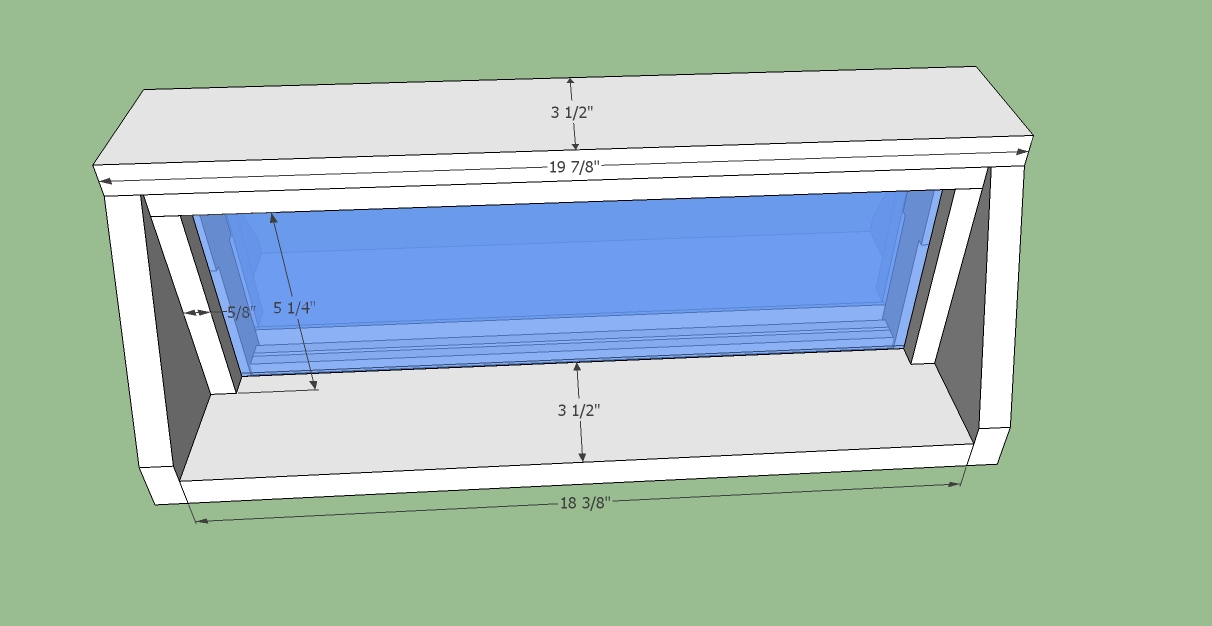
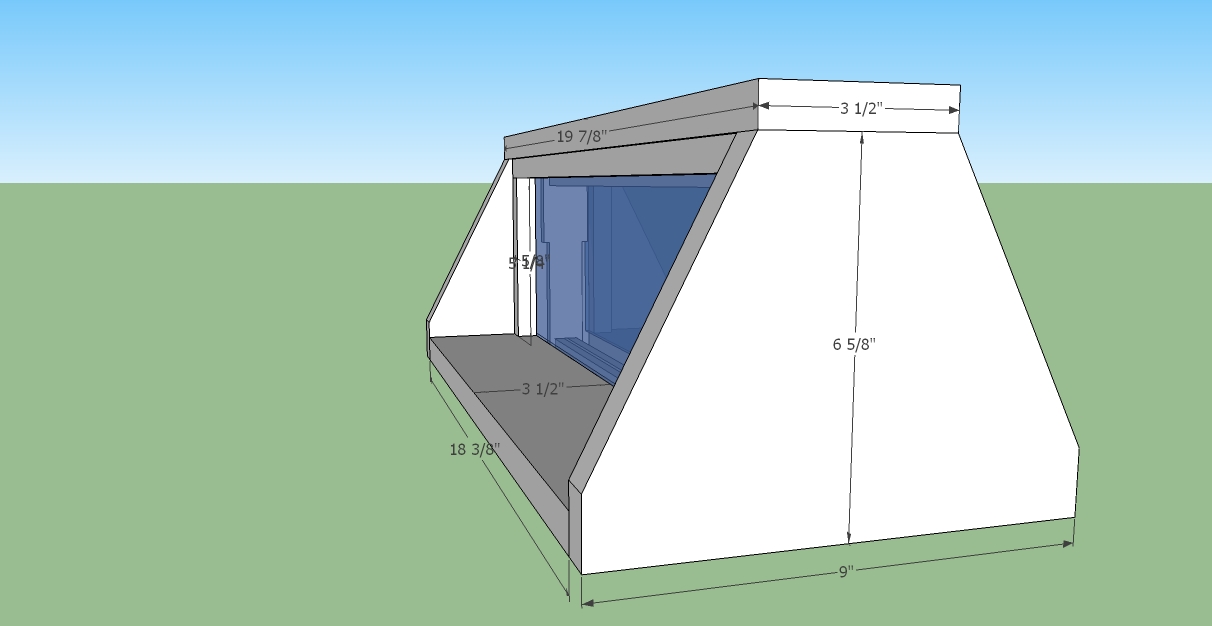
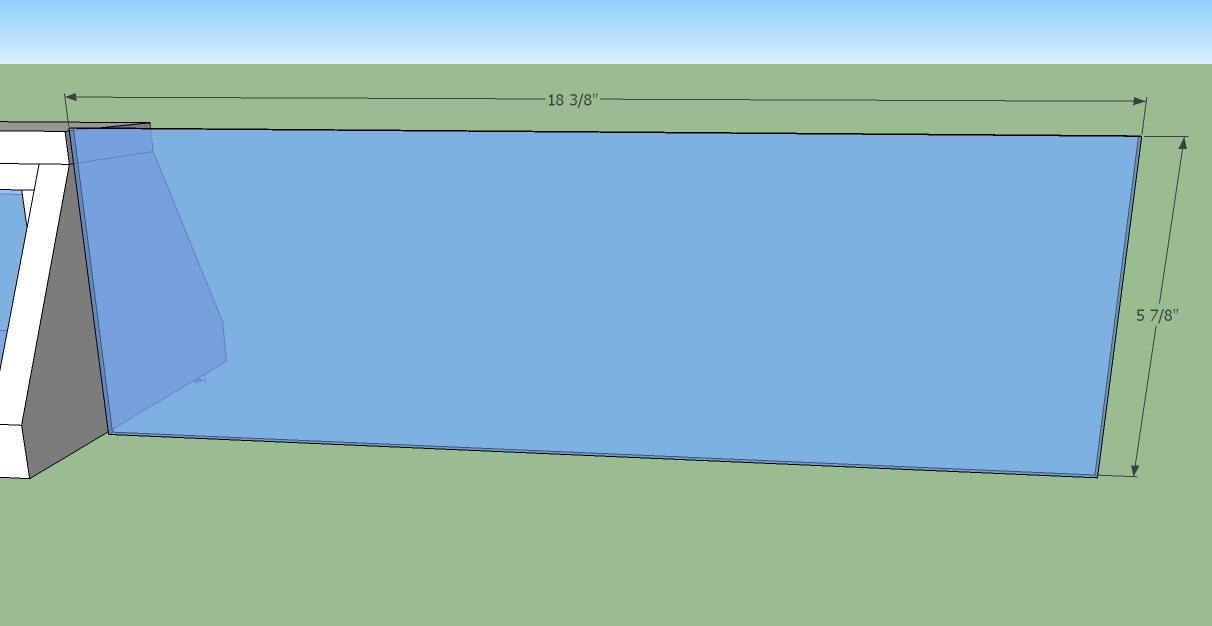
I’ve had a couple people ask for dimensions/plans for this hive, so just decided to upload them. You can still feel free to leave a comment asking for further information but please check out the files first. The hardware is one thing that is not present in the files, but you can see from the pictures what is used.
Sketchup File
Image with Dimensions 1
Image with Dimensions 2
Image with Dimensions 3
Image with Dimensions 4