Have BeeVac, Will Travel
By libhart | March 12, 2012
Can’t wait for swarm season. If the weather holds out I think it’ll be fast and furious this year. I just finished making a beevac for it. Sometimes swarms are so easy that you can just put them right into a box, but this method means no returning later. All credit for the design goes to Rob over at Bushkill Farms. All I did was make an 8-frame version of his great design.
After using a friend’s beevac of the same design for a cutout, I’d been thinking about making one for a while. Not having anyway to make the sliding lid and questioning the value of buying a shopvac just for this though kept me from it. A few months ago I managed to nab a small and cheap but so-far effective router at the local discount tool outlet. That took care of the sliding lid. As for the vac, I was recently poking in the garage and found my old leaf blower. This saw good use every fall at the old house with our two giant oaks out front. I’ve never used it since we moved. Suction source found.
Rob’s site has all the particulars of how this works, but I’ll give a quick rundown with pics of mine. The vac is two pieces that fit on the bottom and top of a regular hive body respectively. The hive body can be of any depth. The top of the bottom and bottom of the top both have weather stripping around their edges to give a good seal on the hive body.
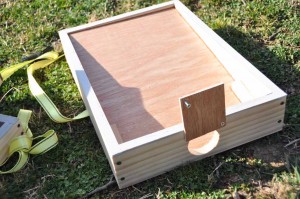
The bottom piece has a ramped floor and a large hole in one end for the vacuum hose (I did have to buy a shop vac hose). This hole then has a gate to close it off once all the bees are vacuumed into the box.

Bottom piece with ramped floor
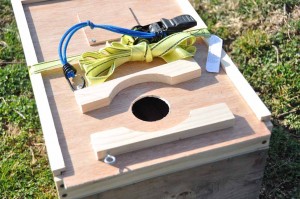
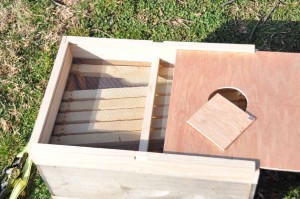
The top piece is more complex. The bottom of the top piece is #8 hardware cloth, the screen used by beekeepers everywhere for providing the most ventilation while being beeproof. The top of the top piece is a sliding lid. The lids slides into a grove that goes around 3 sides of the top piece. This lid then has two holes and some supports. One hole provides a place for the suction. The supports are there for the leaf blower I’m using, but a freestanding vac hose could simply be put into this hole. The other hole has an adjustable gate used to temper the suction at the end of the hose.

The inserted lid showing the hole
for the vacuum and supports for my leaf blower.
The adjuster gate can be seen at the top.

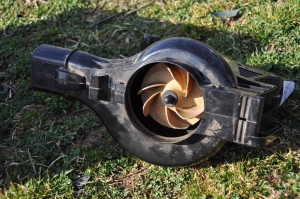
Business end of the blower. This simply sits
over the hole on the lid and is strapped down
with that blue bungee to keep it in place.

Lid partially removed, showing the
suction adjusting gate and the screen
on the bottom side.
The whole contraption is then held togther during use with a ratchet strap. The small notches in the sides of the top keep that from sliding around.

Complete beevac, minus the hose that fits in
the front hole. I just didn’t feel like unpacking it.
The idea is that when the leaf blower is in place on top of its hole and turned on, the suction is split between the gate and the hose that comes from the hole in the bottom piece. The more closed off the top gate, the more suction is provided to the hose. The hose should only have enough suction to just barely pull the bees from the surface on which they’re standing. The bees are sucked into the box through the hose. The ramped floor in the bottom allows the bees a gentler entrance into the box. They can sort of roll up the ramp instead of being slammed into the back of the box. The screen on the bottom of the top piece keeps the bees down in the box. When all the bees are in the box, the hose is quickly removed and the bottom gate closed. If done with the vac still on, no bees will escape. The lid is then slid out from the top with the strap still in place. This exposes the screen, giving the bees plenty of ventilation without allowing any to escape. The entire thing can then be picked up, put in the car, and driven to the apiary. Since the bees are already in a hive body with frames, they don’t need to be dumped into a hive. The hive body can just be removed from the top and bottom of the vac, put onto a bottom board and given a lid, and presto, the swarm has been hived.
Thanks goes to Rob for this design. It is extremely elegant. Not only do the bees benefit from not being dumped, but a large swarm or cutout can be accomodated by simply strapping in an extra hive body before beginning to collect the swarm. This will accomodate as many bodies as you wish to use.

Leave Your Comment